| Drawn up: 05.nov.2008 | © |
|
|
|||||||||||||||||||||


Software system
ASTER
Multi-user extension
for Windows 2000/XP (32bit)
version
ASTER XP 2.5
2 workstations
User manual
Aster is a trademark of IBIK. The trademarks referred to in this user guide are property of their respective owners.
Contents
1. Introduction
Please read this user guide carefully before connecting add-on devices to your computer or installing Aster software.
1.1. General statements
This user guide contains description of key capabilities of Aster software Personal Release (further double-terminal system). We recommend that you thoroughly read this user guide to learn about the system capabilities that are not obvious. This user guide will help you correctly install and setup the system.
Aster double-terminal system provides activation of two workstations (terminals) at one PC. Installation and setup of Aster system is easy and can be completed by any user. Using the terminal is no different from using a PC. However, the system enhances the PC potential and provides capabilities similar to 2 networked PCs.
The terminal includes a monitor, keyboard and mouse. 2 terminals can be connected to one system unit. However, both terminals have similar access to PC resources and periphery (printer, modem, etc). Aster system is designed for Microsoft® Windows® 2000 и Microsoft® Windows® XP.
Monitors are connected to a double-output video card or two video cards. The secondary terminal operates with a keyboard and a mouse connected over a USB interface to a PC.
1.2. Software capabilities
Aster double-terminal system enhances PC capabilities. State-of-the-art PCs have enough processor power and memory space to ensure trouble-free operation of most applications at both terminals. State-of-the-art video cards enable running high capacity graphic programs and game applications at both terminals. Users gain extra advantages from sharing access to the Internet.<
Most state-of-the-art graphic boards have 2 video outputs for a second monitor or TV. To obtain another work or play station you should connect a USB keyboard, USB mouse and a monitor (or TV) to a PC. Many laptops have a connector for another monitor and can use Aster double-terminal system. As well as a multi-terminal system, Aster can be used in the office, in computer classrooms at schools, colleges and universities, it can ensure operation of accounting, cashier’s and warehouse terminals. Aster application has advantages over a conventional PC that can be used by one person at a time. Aster saves expenses because the cost of Aster software is low in comparison with the cost of a system unit. Moreover, a double-terminal PC uses one set of software tools and saves maintenance expenses. The double-terminal PC uses one set of software tools protected with identification keys (however, to simultaneously use a software at both terminals you may need an extra license for the secondary terminal, see the license agreement for the relevant software product). In the absence of a local network, Aster ensures access to data from both terminals.Maximum space between the system unit and the terminal depends on the characteristics of the USB cable and is regularly 3-5 m. Extra USB amplifiers may significantly enhance this distance.
2. Installing Aster system
2.1. System requirements
Minimum system requirements (version Aster XP 2.5)
- Intel Pentium III
- Microsoft® Windows® 2000/ Microsoft® Windows® XP (32-bit software version)
- 256 MB of RAM (128 MB + 64MB for each terminal including the master terminal). Recommended RAM is 512 MB.
- 1 double-output video card or 2 single-output video cards of the same series. Supported series of double-output video cards are the following (see the appendices 1, 2, 3 for extensive lists of recommended video cards):
-
AGP, PCI:
-
GeForce FX5200 – GeForce FX5950, GeForce MX440
-
Radeon 9500 – Radeon 9800 (except All-in-Wonder models)
-
-
PCI-Express:
-
GeForce 6200 – GeForce 8800
-
Radeon X300 – Radeon X1950 (except All-in-Wonder models)
-
Radeon HD 2350 - Radeon HD 3870
-
2.2. Hardware assembling
Please read this chapter carefully. It will help you avoid damaging the PC and new hardware due to faulty integration and minimize the risk of buying hardware unsuitable for Aster system.
2.2.1. Selection and installation of a video cards
To build a double-terminal system you can use a double-output video card for 2 monitors or a monitor and a TV. As a rule state-of-the-art video cards have 2 outputs. However, if a master video card has one output or 1 terminal is meant to use both outputs, it is required that an additional video card is installed. The advisable configuration includes video cards with 2 outputs so, if each terminal uses one monitor only and the master video card has 2 outputs, additional video cards are not necessary.
In case each terminal needs one monitor and the PC has only a single-output video card, an extra video card needs to be installed. In case several single or double-output adapters are used and each terminal needs more than one monitor (for instance, a terminal needs a video projector), the number of video cards (including the master video card) depends on the number of hardware devices connected to video cards (1 video output per 1 monitor). Therefore, in case double-output video cards are used, you will need less video cards. In case you use more monitors, the number of video cards increases.
The advisable configuration includes video cards with the PCI-Express, the AGP and the PCI interfaces. You can test your video card by installing Aster double-terminal trial version. Visit the IBIK web-site to get supplementary information about compatibility of video cards and download the latest updates and Aster trial version.
As a rule, the PCI-Expres or the AGP video card is primarily used when Windows is booting, so a supplementary video card is connected to the PCI slot or to the secondary PCI-Express slot. If necessary, the activation order of video cards can be changed by choosing the right settings in BIOS setup: the PCI video card can be made primary by putting the PCI-Express (AGP) adapter at the end of the list.
Make sure your PC has an extra PCI slot and there is enough space in the chassis for installation of a supplementary video card. If possible, do not use video cards without a fan in closely located slots because they warm up during operation and need cooling. The fact that some video cards have large passive radiators without a fan can hinder installing such cards into closely located slots: the total width of the card may be larger than the space between the slots. Lack of space between the cards can hinder heat dissipation and cause a short circuit.
Most state-of-the-art video cards can be used as part of Aster double-terminal system. The main requirement is compatibility of the video card with Windows multi-monitor mode: all video cards and video outputs (if the video card driver makes it possible) should be defined as independent monitors by Windows (see 2.3.). IBIK offers you limited lists of video cards and their analogs whose compatibility with Aster system has been checked for Microsoft® Windows® 2000 and Microsoft® Windows® XP (see Appendices 1, 2, 3). If you cannot find your video card on the list, contact the technical support centre. IBIK company tests new video cards, releases new Aster updates that you can find at the company’s website along with updated technical information.
Avoid installing video cards of different manufacturers or modifications at the same PC: this can cause hardware conflicts (system faults, hangups, insufficient resources) and problems during installation of incompatible drivers for dissimilar video cards.
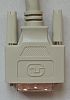
In case you use a double-output video card (two VGA or DVI outputs, VGA+DVI or VGA+TV output), you may need an adapter for a second monitor to make the formats of the video card output and monitor (TV, projector) input compatible. Adapters may be sold together with the video card or you may need to buy them separately. Most digital monitors (LCD, FPD) support DVI and VGA formats and have cables with relevant connectors. You do not need any adapters for their connection.
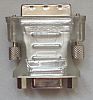 |
DVI-I (DVI) - VGA adapter is used to connect the analog VGA monitor to the digital output of a video card. The video card connection layout is shown below. |
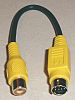 |
VIDEO IN – S-VIDEO connector. VIDEO-OUT coaxial socket is used for TV connection over a standard low-frequency video-cable. |
If your computer runs Microsoft® Windows® 2000 operating system, check the video cards are correctly identified. To ensure independent operation of video outputs it is required that the second output is identified as an independent device. Manufacturers of video cards offer two solutions to the problem: Secondary device in the ATI Radeon 9XXX chip set for the AGP interface (hardware solution) or driver for DualView or DualHead virtual device for nVidia and Matrox chipset video cards(software solution).
Windows 2000 operating system does not support the usage of the second video card output of the ATI Radeon chipset of all modifications for the PCI interface and ATI Radeon 7XXX-8XXX for the AGP interface because the PCI interface and the core chip of these video cards do not allow Secondary device application. Besides, if several similar video cards that use DualView driver are installed, only the primary video card can independently use both outputs. These restrictions depend on the driver properties for video cards for Windows 2000. Visit the website of your video card manufacturer to obtain information on compatibility of your video card with multi-monitor mode of Microsoft® Windows® 2000 operating system. Microsoft® Windows® XP operating system has a versatile driver for DualView device that enables to independently use both video outputs of any video card.
When you buy a double-output video card, check it meets the requirements. Video card and monitor connections, possible problems and recommendations are shown in the table below.
| Connector types | Connection variants | Required adapter | ||||||||||||||||
|---|---|---|---|---|---|---|---|---|---|---|---|---|---|---|---|---|---|---|
|
|
|||||||||||||||||
|
|
|||||||||||||||||

|
|
|||||||||||||||||
|
|
|||||||||||||||||
|
|
|
|||||||||||||||||
|
|
Not used | ||||||||||||||||
|
|
|
||||||||||||||||
|
|
|||||||||||||||||
|
|
|
|||||||||||||||||
|
|
|
||||||||||||||||
|
|
|
|||||||||||||||||
ATTENTION: if you buy a video card with the DVI connector to use it with DVI-VGA adapter, check the video card specifications and the connector design. Make sure the video card has a connector of the DVI-I type, and the connector has the required number of contact holes (see the pictures in the table). Unfortunately, the connector with the right number of holes may not support the DVI-I format: the contacts used by the DVI-VGA adapter may not be used in the electric circuit of a video card or may be directly connected to the VGA output (in this case a VGA monitor connected to a DVI connector with an adapter will always display a copy of an image of the VGA output).
If you have enough experience, you can visually check if the contacts of the analog group (in the corners of the "cross") are connected to the circuit elements of the video card. Otherwise, check the full specifications of the video card: price lists may contain only a brief information about the type of connectors. If the package includes the DVI-VGA adapter, the video adapter supports the DVI-I format (true for the video adapters in the original package). The problems with the DVI output are most probable with video cards indexed LE or SE and with low profile models (the video card board is significantly narrower than the metal bracket).
Before you start installation of the video card, power off the PC and unplug the electric cable. Remove the case. Find a spare PCI slot on the system board (in case there is a spare PCI-Express\AGP slot, you can use it) and remove the overlay. Attention! Static electricity may damage the electronics. Carefully insert the video card into the slot and fix it with fasteners. Use the manual if video card installation involves cables and adapters. After that, reinstall the cover, connect the monitor(s) to the video card and plug in the PC.
2.2.2. Connection of input devices
The secondary terminal uses input devices connected with a USB cable. The following connection variants can be used:
-
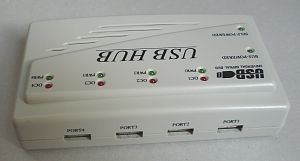
A USB-keyboard and USB-mouse connected to spare USB ports or an external USB-hub;
-
A USB-keyboard with PS/2 socket for connection of the PS/2 mouse;
-
A PS/2-keyboard and PS/2-mouse connected to a USB bus by means of an active PS/2-USB adapter;
-
A USB-keyboard and COM-mouse.
PS/2 device is treated as a USB device if it is connected to a USB bus with a PS/2-USB adapter.
 |
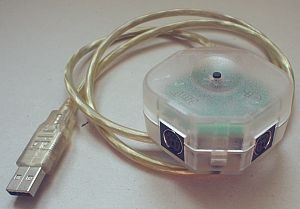 |
| USB-HUB | Active PS/2-USB adapter |
 |
 |
|
| USB-connector (mouse and keyboard) | PS/2-connectors (mouse and keyboard) | COM-connector (mouse) |
Devices connected to a USB bus must be automatically identified by the operating system and begin functioning normally. It is recommended to connect a keyboard and a mouse to a USB bus before Aster software is installed or after you have run the secondary terminal to be able to check operability of the devices. If Aster software has been installed and enabled, but the secondary terminal has not been started, the connected USB devices are reserved for the secondary terminal and their operation cannot be checked.
The main terminal (Terminal 1) can also use USB input devices. In this case two sets (2 keyboards+2mice) are connected to USB ports. The PC automatically allocates the input devices to different terminals. If the result of allocation does not suit your purposes, you can either swap the devices, or connect the devices to USB ports in the inverse order (you need not power off the PC), or manually allocate the devices to USB ports (see 3.6.3.).
2.3. Video system setup
After video cards have been installed, you should check if they operate correctly. Connect all the monitors to video cards’ outputs and power on your PC. A double output video card is usually identified as a single output adapter in case it is connected to one monitor. When booting is finished, Windows automatically finds and installs the drivers of the new video cards. However, you may have to select the directory where the video driver is saved. It is possible that the video driver does not allow using a multi-monitor video card. In this case download the updated version of the driver from the manufacturer website. If a video card has been correctly installed, the second monitor should appear (see the picture) in the Settings tab of the Display dialog box (Control Panel\Display).
After all video cards have been correctly installed and operate normally (the number of monitors in the Display dialog box corresponds or exceeds the real number of monitors), it is recommended to select proper Display settings (resolution and color depth). In the Display dialog box choose the monitor and set required color depth and screen resolution. Make sure the monitor does not distort the image. It is recommended that tuning is completed for all the monitors. If the monitor that you have selected has not been used before (has been off), the operation system will prompt you to extend the desktop for this monitor. Confirm extension, otherwise it will be impossible to check if the monitor operates correctly.
Before activation the secondary terminal, it is required that the second monitor is connected. Activation of a terminal with a vacant video output may cause system hang-up.
Some double-output video cards need extra setting to activate the DualView mode that allows to use video outputs independently (sometimes in the automatically activated mode video outputs “show” the same picture or together make up a double size picture. In these cases video card is identified as having a single output). To set the DualView (DualHead) mode, read the video card user guide.
2.4. Installing and removing Aster software
To install and remove Aster software you should have administrator privileges.
Installing Aster software is easy. Insert the disc into the drive. The installation Wizard will start automatically. If the wizard does not begin automatically, find the setup file on the disk and double click it. Follow the prompts of the installation wizard.
To proceed the installation you must accept all the terms of a license agreement. Please, carefully read the license agreement. If you accept all the terms, select “I Agree” and click on Next (if you do not accept at least one of the terms of the license agreement, you must cancel installation at this stage; you can return the CD with Aster software and all accompanied package with unused serial number to the vendor).
If you want to install Aster into a folder different from the one selected on default, specify the location.
After installation is finished, select Aster Control (Start\Programs\Aster Control) and follow the prompts to run and configure Aster (see 2.5).
To remove the Aster software use the standard procedure provided by Microsoft® Windows®. Open "Add and remove programs" utility in the Windows Control Panel, select Multi-user extension Aster and press Remove. If Aster system is running, to complete removing it is necessary to restart the PC.
2.5. Software activation, trial period
To start activation of Aster software you should have administrator privileges.
If you run Aster for the first time (Start /Start Aster), it is required to activate the software. The software can first be activated without the serial number for the trial period of 10 days (see the picture).
During the trial period you can assess the program and decide to buy the software or enter the serial number. No restrictions are imposed on the software functions during the trial period. Click on Try it out button and than OK to activate the program for the trial period of 10 days. To activate the software by entering the serial number without the trial period press Enter serial number.
After the trial period expires, the software will not start until you enter the serial number. The relevant message window will appear on the screen (see the picture below). Press Continue to start activation.
2.5.1. Software activation procedure
Software activation can be carried out automatically or you can manually convert the individual serial number into an activation key related to the soft- and hardware configuration of a computer. Therefore, the activation key can only be used at the computer where it has been generated.
The software can be activated with one serial number 4 times only. Thus, it is possible to reactivate the software at another computer in case the software and hardware configuration changes significantly (reactivation at another computer, operating system reinstallation, central processor or motherboard replacement). An extra method of activation restoration is described in the note to this chapter.
Activate the software carefully to avoid wasting the limited number of activations!
1. Enter the individual software serial number and press Activate (in case you have not been given the serial number together with a copy of the program, use the contact information that you can get by clicking on Buy to obtain the individual serial number);
2. Choose automatic or manual activation by clicking on relevant buttons. To automatically activate the software you will need to establish connection with the Internet. If Internet connection is limited or cannot be established, choose manual activation.
-
If you have chosen automatic activation, protection system will connect to the protection server on the Internet and obtain the activation key for this computer. If operation has completed successfully, the message window will appear on the screen and indicate the number of available activations (see the picture below). Click on OK to complete automatic activation.
3. If you have chosen manual activation, the protection system will generate the Hardware code for this computer (see the picture below). The individual serial number and Hardware code are required to obtain an activation key.
Copy or carefully write down the hardware code and use it with the individual serial number for activation key generation by means of the Internet-service (https://proactive.star-force.com/2.0/activate.php) or telephone hot line if Aster supplier provides such a service. You can use the internet service at any computer connected to the Internet.
Click on Next to enter the activation key.
If the activation key cannot be obtained immediately, you can close the program by clicking on Back, Back, Exit. In this case after you obtain the key, it is required to start Aster once again (Start/Start Aster), follow the instructions in 1 and 2 of this chapter (enter the individual serial number, click on Activate and select manual activation) and click on Next in the window with a hardware code. Do not try to start Aster before generation of the activation key because this can affect the information saved about activation and you will have to generate the key once again and consequently use another activation attempts (activation wasting).
4. To complete manual activation enter the activation key and click on Activate.
IMPORTANT NOTE. It is possible to restore the activation of the software in case the operating system has been reinstalled or the system is restored in the state when Aster was not installed. You must be an experienced user and have administrator privileges. After successful software activation with an individual serial number (not during the trial period), the activation key copy is saved in a key.reg file in the directory where the software is installed (for example, C:\Program Files\Aster Control). It is recommended to save this file in the directory protected from deletion. In case the system is reinstalled or restored, add it to the System Registry (open and agree to add information to the System Registry), then reboot the computer. This method of reactivation does not reduce the activation attempts. To add the data to the System registry the user should have administrator privileges.
3. Using Aster software
You can configure Aster double-terminal system by opening Start/Programs/ Aster control (see the picture). You can place the icons and create shortcuts (for instance, Start Aster) on the desktop to make operation easier. Different programs on the Aster Control list cannot run simultaneously at the same terminal. Thus, if a program does not start, make sure no other program on the list is running. Should a program be running, close it or wait until an on-going operation is completed (for instance, the secondary terminal is starting or terminal number is being browsed).
3.1. Activating, starting and deactivating Aster software
To activate and deactivate Aster software you need administrator privileges. Users with limited privileges can start the system (launch the secondary terminal).
Starting Aster means the launching the secondary terminal. You can start Aster at any moment under the condition that Aster is activated. Aster is a multi-user extension of Microsoft® Windows® operating system kernel, so you need to restart the PC to activate or deactivate the system. The system is deactivated on default after installation and Aster software does not influence PC operation.
If Aster software is deactivated (it has just been installed or deactivated), it is possible to enable it with Aster Control utility (Start\Programs\Aster Control). You will be prompted to restart the PC immediately (press Activate and Restart) or later (press Activate). The secondary terminal is able to be launched after the PC is restarted.
To start Aster and launch the secondary terminal click on Start Aster in the main menu or Start\Programs\Aster Control. If you want the second terminal start automatically, use Aster Autostart Control (see 3.3.3.). The second terminal can be launched if Aster software is activated, a double-output video card or an extra video card for the secondary terminal desktop is installed.
If you try to run the program Aster Control right after activating Aster but before the system restart or after emergency restarting after the system failure, it is possible to cancel Aster activation by pressing Cancel activation or continue activating with restart by pressing Restart (see the picture below).
If necessary, it is possible to deactivate Aster software by clicking on Aster Control in the menu Start\Programs\ Aster Control. To deactivate the system you will be prompted to restart the PC immediately (press Deactivate and restart) or later (press Deactivate). When deactivated, Aster software does not start and does not affect computer operation. This mode is recommended when running system diagnostics or installing new devices.
3.1.1. Computer shutdown
If the PC is used simultaneously and independently by several users, it is required to synchronize computer shutdown to avoid data loss at a terminal when the other terminal shuts down. Aster system solves this problem by automatically synchronizing computer shutdown at both terminals using the following algorithms:
-
after all applications are closed during the system shut down at one terminal, the system shutdown window appears (see the picture below). The indicators in the left bottom corner of the window show the status of the terminals (the master terminal refers to the indicator on the left, the secondary terminal refers to the indicator on the right). Red color indicates the system has been shut down, flashing green indicates operation;
-
during the system shutdown at one of the terminals the forced system shutdown window appears on the screen of the other terminal. Changes in the documents must be saved in 15 seconds (see the picture below). You can postpone the system shutdown for a minute by pressing postpone for a minute (you can postpone the system shutdown as many times as you need, but the window will remain on the screen and will make operation inconvenient);
-
when waiting time expires, the forced system shutdown is carried out. Changes in opened documents will not be saved. You should have time to save the changes in the documents and fulfill any other operations related to finishing the work before waiting time expires. If necessary, postpone the system shutdown;
-
if by some reason the alert window does not appear (for example, terminal hung-up), the button "Skip waiting for other workplaces" becomes available after 45 seconds of waiting at the terminal where the system shutdown has been started. If you press this button, the system will be shut down irrespectively to the status of the other terminal. Use this button only in case the standard system shutdown is not available.
3.2. Monitor settings
You need administrator privileges to carry out monitor settings. Users with limited rights can start the program in the overview mode.
Monitor settings can be carried out only when Aster software is activated (see 3.1.) Monitor settings programs make it possible to allocate monitors (video outputs) to terminals, enable or disable the monitors. To start the program open Start\Programs\Aster Control\Monitor settings.
The setting window contains a table: rows contain information about video cards and their outputs and columns indicate terminals (the main terminal MAIN + secondary terminal). Monitors that are connected to one video card are joined with a dotted line.
To allocate a monitor to a terminal you need to click the relevant cell in the table. If you click the cells in the AUTO column, the monitors will be automatically allocated to terminals. By default the automatic allocation mode is set to all the monitors. In most cases automatic mode is optimal and recommended for application. It is possible to use the monitor setting window to check monitor allocation.
Red circle mark indicates the terminal on which the monitor is currently operating (the terminal has been started). It is possible to reallocate the monitor by clicking on another cell. New mark will be not colored (usually gray) and it indicates that new settings will be applied after system restarting. It is required that at least one monitor is allocated to the main terminal. Otherwise Aster will force allocating all the monitors to the main terminal to prevent failures in the system. You can change forced allocation in the monitor settings window (restart the PC then).
In case any video card or video output must not be used when the secondary terminal is started (for example, TV output that has been detected as separate monitor but not currently used), it is required to disable the output by clicking on the relevant monitor (it is possible to disable a video card by clicking on all the outputs). If you click the monitor again, disabling will be cancelled. Disabling of an operating monitor will be applied after system restarting. As an alternative to disabling you can allocate an extra video output to the terminal where the main output is used. In this case you will be able to control video outputs by opening Control panel\Display\ Settings tab on the corresponding terminal.
One terminal can use several monitors. If it is required to connect several monitors to one terminal and double- output video card is available, it is recommended to allot all video outputs to the terminal with several monitors. It is safe to use 2 video outputs of the same video card at different terminals only if these terminals use only one monitor each.
3.2.1. Input devices swapping
You need administrator privileges to carry out swapping of input devices. Users with limited rights can start the program in the overview mode.
The additional function of the monitor setting program (see 3.2.) is to control the algorithm of the automatic allocation of input devices. It is possible to swap allocation of the keyboards and mice between two terminals by setting the check in the relevant cell.
This feature is useful if you install Aster software on a laptop where the embedded keyboard may refer to the external (main) monitor and an external USB keyboard may refer to the embedded (secondary) screen. It is possible to remove the inconvenience by swapping the input devices.
3.3. Auxiliary functions
3.3.1. Language settings
You need administrator privileges to change the language settings. Users with limited rights can start the program in the overview mode.
Aster software allows to change language selected on default and used in text messages. To change the language settings open the language settings window (Start\Programs\Aster control) and select the language.
3.3.2. Terminal number
When running Aster double terminal system, you can open the Workplace Number window (Start\Programs\Aster Control) if you need to know the terminal number which you are working on. The information box will open and indicate the terminal number. The box will automatically close in some seconds. The main terminal is the first.
3.3.3. Autostart mode
You need administrator privileges to enable and disable the autostart mode. Users with limited rights can start the program in the overview mode.
It is possible to make the secondary terminal start automatically while your PC is booting. Select Autostart control by opening Start\Programs\Aster control and put a check against Enable Aster autostart mode (see the picture below). If you need to disable the Autostart mode, start the Autostart control window and remove the check.
It is not recommended to enable the Autostart mode right after Aster installation. We recommend that you first activate Aster software as described in 3.1. and check monitor settings as described in 3.2. Make sure all the monitors are connected to the PC. Then you can try to start Aster and, if successful, enable the Autostart mode.
3.4. User profile settings
Microsoft® Windows® operating system enables saving each user personal settings. Users can choose the desktop settings, have an individual document folder and e-mail box, select applications’ settings, keep personal Internet history, configure the Start menu and Favorites, etc. Personal settings give users different access rights to the system, network names and log-in passwords. Personal settings are created when you create new user accounts in the system. You can add a new user account in User Accounts utility in the Control Panel by entering a name, a password if necessary and assigning system privileges. After booting the terminals will show the list of users and you can log in by entering a password if one has been set.
In case user profiles are not created (the administrator profile or common user profile is used to log in on default), a user list does not appear after system booting and both terminals log in automatically.
3.4.1. Automatic login
You need administrator privileges to change the automatic login parameters. Users with limited rights can start the program in the overview mode.
Aster software enables users to choose the default name and the default password for each terminal. Default user name and password are used for automatic login to the system at the terminals. Thus, you do not need to enter the name and password before you start work. Open Users and Passwords in Start\Programs\Aster control to set automatic login parameters.
The box contains the list of users registered in the system and allows to set default user name and password for each terminal. You can select a user name from the list or type it in the Default user name box. A check against 'Perform automatic logon' enables automatic login at the selected terminal. The check enables the system to use the name and password for identification of the terminal user. Automatic login helps to avoid stops in terminal starting (for choosing an user) and eliminates the necessity to enter the password.
To avoid mistyping enter the password twice. First enter the password in the Password box and then in the Retype password box. The passwords must be identical. If the selected user is not protected by a password, the boxes should be left empty. Click on the Password boxes and remove the password if necessary. Users can enter the passwords only when the autologin mode is enabled.
The software enables changing the automatic login parameters for the selected terminal only. Before changing the parameters of the other terminal, press Apply. If changes already have been saved by pressing Apply, you cannot reverse the changes by pressing Cancel. If the Autologin program is running at the secondary terminal, terminal selection will be disabled: at the secondary terminal it is possible to select Autologin settings for this terminal only.
3.5. Sharing access to data and programs
Aster double-terminal system offers the possibilities similar to the ones of a local network. The advantage of sharing access to data is one of them. Both terminals have access to the local hard disk and CD disk drive as well as to any connected external storage. This allows using the documents, databases and other data efficiently.
You can start all applications installed at your PC at any terminal. Most software products maintain normal operation even if they are used by both terminals simultaneously. You can use Aster system as 2 networked computers. However, you do not need 2 software packages or a data server.
Software issues specific to double-terminal environment (failure to start the second instance of application or improper behavior of the second instance) should be addressed to the IBIK technical support service but not to the software manufacturers' technical service.
3.6. Additional capabilities
The double-terminal environment supports multi-user games that use the TCP/IP protocol for network connection or DirectPlay (part of Microsoft® DirectX® package). The games can simultaneously run at 2 terminals and operate similarly as on 2 networked PCs. The network card or any physical network connection is not necessary. To start a multi-user game select TCP/IP or DirectPlay connection and start the game as a HOST (server mode) at one terminal. The other terminal can join the HOST by using the local IP-address "127.0.0.1" and run the game as a CLIENT (client mode). If game will prompt for the server IP-address, enter 127.0.0.1 (without quotes) and press Connect.
Other network programs using the Client-Server architecture and the TCP/IP protocol (including database programs) can also be used in double-terminal environment without network installation. If the the double-terminal system is connected to the physical network, and a server program (for instance, game in the Server mode) is running on a remote PC, the terminals can act as independent network clients. Thus, client-programs can start at the terminals and connect to the remote server independently. In this case it is required that you specify the real network address of the remote server.
To provide access to the Internet at each terminal (remote access over a modem or a cable), open the Internet Explorer, select Internet Options in the Tools Menu, click on the Connections tab and put a check against Dial whenever a network connection is not present. Then to connect to the Internet, you will have to activate connection at any terminal. After connection is established, both terminals will have access to the Internet. If network connection is used to provide access to the Internet (always active connection), you do not need to change the settings.
We recommend that you use mailing programs (for instance, Outlook express) carefully at the terminals. Using the common folder that contains inbox, sent messages and service information may cause problems. If users access this folder simultaneously from different terminals one of them will be refused access to the folder opened at the other terminal. As a result the mailing program will create a new mailing archive and the previous folder and its content will become inaccessible. The current location of this folder is identified individually for every Windows user. Thus, to avoid data loss you should create user accounts (see 3.4.) and individual folders for the messages. Individual folders make it impossible to browse the messages of another user. If adding new users is impossible or undesirable, simultaneous access to the folder should be prohibited.
3.6.1. Using sound devices
In case several sound playing or/and recording devices are connected to your PC, it is possible to allocate them to different terminals. The terminals will independently use sound devices.
Allocation of sound devices is carried out in compliance with the standard procedure of Microsoft® Windows® for sound devices and multimedia. Multimedia settings are saved independently for each user account. So, to allocate sound devices to different terminals you will have to create user accounts (see 3.4.).
To allocate sound devices, open the Control Panel\Sounds and Audio Devices (see the picture).
At the main terminal open the Sounds and Audio Devices window in the Control Panel, click on the Audio tab and select the sound playing, recording or MIDI playing devices to be used by default at this terminal (actually for the current user). Make sure to put a check against “Use only default devices”. Do the same at the second terminal or log in as the second-terminal user and select the sound playing, recording or MIDI devices for the other terminal. Sound devices will be allocated to user accounts regardless of the terminal where settings have been made.
In case sound devices are supposed to be used by one terminal only, it is recommended to switch off audio messages at the other terminal by selecting 'No Sounds' scheme in the Sounds tab. However, this setting does not hinder sound effects of the programs (games, media players) that use the sound devices directly, even if these devices are allocated to the other terminal.
3.6.2. Assigning IP- addresses
To achieve correct operation of some network applications (for example, traffic control programs, some network games, etc), it is required to assign the terminals individual IP addresses. Aster software provides assigning IP addresses to the terminals. The IP addresses should be selected from the list of IP addresses defined on the computer.
To be able to assign the terminals different IP addresses it is necessary to add the required quantity of IP addresses to the netword card (it can be a virtual loopback network adapter). Log in with administrator privileges, open the Control panel, select Network connections and select Local area connection to which you want to assign additional IP addresses.
-
If you add new IP-addresses to a real (physical) network adapter that is connected to a network, ask the network administrator for the available IP addresses.
-
In case it is impossible to add IP addresses to the real network adapter (DHCP
service that provides automatic network address is used or the computer
may have one
IP-address only), it is necessary to use a virtual network adapter to add
new IP addresses. In this case in the
properties of the real network connection
(which is being used to access network or the Internet)
on the Advanced tab enable
shared access to the network for the virtual network adapter.
- If the only system network adapter is used for connection to the Internet over a dedicated line (broadband cable) or Internet connection over a modem is used (remote access to network) it is necessary to use a virtual network adapter to add new IP addresses. In this case in the properties of the Internet connection on the Advanced tab enable shared access to the Internet for the virtual network adapter.
In the connection properties window select the Internet Protocol (TCP/IP) and click on properties (see the picture below).
The TCP/IP protocol for the selected network connection should use the static IP-address (see the picture below). Select Use the following IP address and enter the main IP address and subnet mask for network connection.
-
If you are setting up a real (physical) network adapter connected to a network, ask the network administrator for the static IP address.
If necessary enter the IP address of the default gateway and the IP address of the DNS servers (these addresses are not necessary when you use a virtual network adapter). If all these IP addresses (in the first place, the main IP address and subnet mask) have been entered before, it is better leave them unchanged.
After the TCP/IP protocol settings are done (at least the main IP address and the subnet mask specified), click on Advanced in the Properties window.
In the advanced TCP/IP settings window (see the picture below) it is possible to assign additional IP addresses to the network connection. In the IP settings tab in the group of IP addresses click on Add and enter the IP address for the main terminal and the same subnet mask as for the main IP address (new IP address should differ from the main IP address but should be a part of its subnet). Repeat these steps to add the IP address for the second terminal.
Thus, three IP addresses will be assigned to the network connection in total. The main (the 1st on the list) IP address will be used by the computer system services, and the other two will be used by the applications at different terminals.
Confirm new settings by clicking on OK in all open windows of the network connection properties. Follow the prompts of the system and reboot if necessary. Check the network availability (if the computer is connected to it). Now it is possible to start assigning IP addresses to terminals using IP-Addresses utility from the Start/Programs/Aster control menu (see the picture below).
Enter the IP addresses for the main and secondary terminals in the relevant boxes and click on OK. From now the terminals will use the assigned IP addresses. Client-applications will send data from the assigned IP address, server-applications will receive data at the assigned IP address. The fundamental IP addresses conflict is eliminated when two instances of a server-program start at different terminals. All the system services of the computer will use the main IP address as before assigning (default IP address).
IP addresses are assigned to the newly started applications but not to the continuously running ones (if they were running at the moment of assigning). To ensure all aplication are using new IP addresses you may need to restart some of them or reboot the system.
IMPORTANT NOTE: remember that if the computer is connected to the network (particularly to the Internet), using IP addresses prohibited in the network will result in access denial at the terminals. This may occur when you are using a virtual network adapter for assignment of additional IP addresses in case the computer may have strictly one "external" IP address (typical for the connections over a modem or a dedicated broadband cable). In these cases it is necessary to enable shared access to the network connection for the virtual adapter (in the advanced properties of the connection), or use hardware or software routers which are capable of translating "internal" IP addresses (assigned manually or "local" ones) to the only "external" IP address (assigned by network provider or "global" one) and back. The required network service is named Network Address Translation - NAT.
3.6.3. Device management
To change device settings you should have administrator privileges. Users with limited rights can start the program in the overview mode.
Aster device manager allows allocating keyboards and mice to the terminals. It is required to fulfill manual allocation when automatic allocation results are not adequate for your needs or devices should be fixedly allocated to terminals. You can fulfill manual allocation by selecting Device manager in the Start\Programs\Aster Control menu.
The program shows plugged-in devices (keyboards and mice) as a block diagram in accordance with location of devices in the system Device Manager. To help identifying a device in the diagram the program highlights active devices (movement of the mouse, keystrokes) and the connection path in yellow.
Using the device manager it is possible to make the following settings:
-
assign a terminal number (options: Place 1, Place 2);
-
enable or disable devices (controlled by the checkbox against Disable for all workplaces);
-
select manual or auto assignment (controlled by the checkbox against Enable auto-assignment).
To edit the device settings, left click the relevant block in the diagram. The device will become highlighted in red and options will be available for editing. It is possible to select only keyboards and mice for editing. Devices of another types and intermediate elements cannot be edited.
New settings become effective immediately after you click on OK or Apply. If you need to change setting for several devices, you must save the settings separately for each device (click on Apply before switching to another device).
IMPORTANT NOTE: saved USB keyboards and USB mice settings are specific to the device models and connection schemes which were used when settings were done. If the same device is plugged into another USB port or replaced with the device of different model (even if it is plugged into the same USB port), you will have to set it up again.
3.7. Possible problems and troubleshooting
3.7.1. If Aster double-terminal system does not start, causes system failures, hanging, emergency restarting or affects the operation of Windows or its applications, carefully read this chapter and follow the recommended instructions. If failures are not eliminated, contact the IBIK technical support service and provide the following information in details:
-
Aster software version (for instance, ASTER XP 2.5, 000, the version is indicated in Aster Control Panel, see 3.1.);
-
Aster state code, in case the secondary terminal does not start (see 3.7.6.);
-
Windows operating system version (Control Panel\System\General tab, for instance, Microsoft Windows XP Professional, version 2002, Service Pack 2);
-
problems description (system hanging, unexpected restarting, desktop image distortion, keyboard failures, Windows applications and components errors, etc);
-
how often failures happen;
-
conditions causing failures: Windows loading, running Aster, starting and operation of certain applications, using some Windows or applications functions, plugging or enabling of certain devices, just after some time passed (even the system is idle), etc;
-
measures taken to eliminate errors and failures and results;
-
list of graphics cards installed at the PC (including the onboard adapter, if it is available);
-
list of installed applications;
-
list of attached devices (printers, scanners, etc);
-
Type of Internet connection if available.
If necessary, the technical support service will request for additional information to identify the cause of errors.
3.7.2. Conflicts between the video drivers software and video cards hardware or incompatibility of some video cards with Aster software can cause system failures. These failures may result in image absence at the secondary terminal, hanging or emergency restarting when the second terminal starts or video modes are changed. If errors occur, check the video drivers operate correctly. You will have to deactivate the double-terminal mode (see 3.1.) and restart the PC. After PC restarting open Start\Settings\Control Panel\Display and extend the desktop onto the secondary monitor in the Settings tab, ensure that all monitors display the parts of the desktop. Try changing the resolution and color depth several times to make sure no errors occur. Carry out this procedure with each video card and video output. Make sure video card settings are saved after PC restarting.
If system hanging or/and emergency restarting occur spontaneously during operation, it is probably that some graphic acceleration functions of one or several video cards cannot operate in the multi-monitor environment. To check this, you will have to deactivate the double-terminal mode (see 3.1.) and restart the PC. After PC restarting, open Start\Settings\Control Panel\Display and by turns select each monitor by clicking on Advanced button in the Settings tab to open the Advanced Settings window and click on Troubleshoot tab. Set the hardware acceleration control in the position that corresponds to the minimum acceleration of the video card (disable all but basic accelerations).
After setting hardware acceleration for all the monitors, enable and start Aster as described in 3.1. If failures still occur, notice if their type or rate have changed. Please contact the IBIK technical support service and provide information on the failures and measures taken (see 3.7.1.).
3.7.3. Some applications that use or create data files with exclusive access can operate incorrectly and errors can occur, if you simultaneously run them at both terminals. The application that is started first runs correctly. To ensure adequate operation of such applications at both terminals, you should change the settings in a way that makes applications refer to different working directories. At the terminals create applications’ icons with the parameters in the command line that refer to an individual working directory (not all the programs can enable such settings). It is possible to individually set the parameters for each user account. In this case the terminals will automatically use the individual applications settings relevant to the user name. It is recommended to create an account for each user and select individual settings of all applications at the master terminal (3.4.) and then at the secondary terminal. If the program does not allow changing the location of the working directory, it is possible to install 2 copies of the program in different directories and create icons for starting the program from different directories.
3.7.4. All DOS programs in the double-terminal environment can operate in the windowed mode only. It is not recommended to start DOS graphic applications to avoid unexpected effects. To start DOS graphic applications disable the double-terminal mode and restart the computer.
3.7.5. If your PC does not operate correctly after Aster system installation, disable Aster and restart your PC as described in 3.1. If errors occur during booting and you cannot disable Aster, restart you PC in the Safe mode and disable Aster in this mode. You can boot you PC in the Safe mode by doing the following: power on your PC (system testing will be carried out, the table containing computer configurations will appear on the screen, the PC will beep), press and hold F8. Windows booting variants will appear on the screen, select the Safe mode. In case Aster software is disabled, it does not influence PC operation, if failures still occur, contact the PC vendor.
Test the PC for viruses, check all internal and external devices run correctly, make sure the hardware is compatible with the operating system, check there are no hardware conflicts between new devices and the system board, check the operating system integrity.
3.7.6. In case an unexpected error occurs when you start or disable Aster (see the picture), write down the software version number (together with the letters) and Aster status code and forward the data to the technical support service. If necessary, the technical support service will request for further information.
In case errors that hamper normal operation occur when Aster software is running, please contact out technical support service support@ibik.ru. We will find a solution to your problem.
4. Usage conditions and warranty
It is essential that you use Aster software in compliance with this user guide. Visit the IBIK web-site www.ibik.ru. to download updated versions of Aster software. The manufacturer guarantees trouble-free operation in the course of a year from the day when the software was purchased under the condition that you fulfill all the requirements of this user guide. The manufacturer guaranties Aster software compatibility with Microsoft® Windows® 2000 and Microsoft® Windows® XP operating systems and the basic application package.
All rights reserved, © IBIK Ltd (Certificate No 2007613225 dated 31.07.2007 by Russian Patent and Trademark Agency by request No 2007612922 dated 17.07.2007).
IBIK Ltd is an innovation enterprise involved in computer technologies research, development and production of computer equipment. It was established in 1992.
5. APPENDIX
APPENDIX 1. List of tested video cards and their analogs that can be used with Aster double terminal software for Microsoft® Windows® XP. The list shows the results of tests carried out before 01.03.2005. The list is part of Hardware Compatibility List (HCL) for Microsoft® Windows® XP operating system. The adapters that were not tested or do not meet the Aster system compatibility requirements have been excluded from the list. Visit the web-site of IBIK to find new results of video card tests.
| Microsoft® Windows® XP |
|---|
|
ATI Technologies, Inc |
APPENDIX 2. List of tested video cards and their analogs that can be used with Aster double terminal software for Microsoft® Windows® 2000. The list shows the results of tests carried out before 01.03.2005. The list is part of Hardware Compatibility List (HCL) for Microsoft® Windows® 2000 operating system. The adapters that were not tested or do not meet the Aster system compatibility requirements have been excluded from the list. Visit the web-site of IBIK to find new results of video card tests.
| Microsoft® Windows® 2000 |
|---|
|
ATI Technologies Inc. |
APPENDIX 3. The list of tested double-output video cards and their analogs that can be used for starting two terminals per one video card in the Microsoft® Windows® 2000/XP environment. The list shows the results of tests carried out before 01.01.2008.
ATTENTION! The table contains the names of the core video card chips. Their compatibility has been checked by testing the relevant video drivers. Particular video card circuit based on any of these chips may partially use its potential and therefore hinder using both outputs of a video card independently. Refer to the available information about your video card or contact the manufacturer to find out if the video card is capable to drive two monitors independantly (show different pictures at different video modes as required for the compatibility with terminal system).
|
NVIDIA Corporation, GeForce series
RADEON 7000 SERIES |